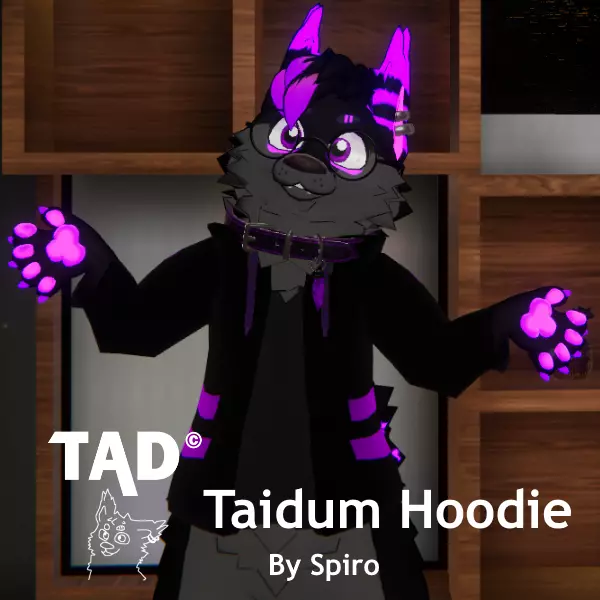
TAD Taidum Hoodie
That's right! We've got a Taidum hoodie! After all my hard work and time, I'm here to release the Taidum Hoodie. I have created 2 unity packages, "TaidumHoodieBySpiro_v#.#" & "IrixTaidum2.0_TaidumHoodieBySpiro_v#.#". Both are the same in terms of hoodie assets, however, the package with the “IrixTaidum2.0_” name extension is already set up containing VRC Physbones, FX, String Control, everything. However, to get the already set up assets, you need to be verified on the Taidum Discord. To get verified on the Discord & have access to asset channels, you need to buy the Taidum License here! The Discord can also be found on the Taidum Gumroad page. Once on the Discord, the already set up file download can be found on the #⭐confirmed-buyer-assets-share⭐ channel.
Updates & Changes
5/9/2022 - v0.7
- Reworked the UV Map. Should be a LOT easier for 2D texture peps to texture now. Should also look a lot nicer when texturing in Substance Painter. >>WARNING<< ((This breaks pre-existing Hoodie Textures! You'll need to make a new texture. I apologize for such a drastic change but it needed to happen.))
- Replaced the Default texture with a new one to fit the new UV map. Enjoy.
- Fixed some small changes with weight painting once again.
VVVV Time for setup instructions! VVVV
TaidumHoodieBySpiro_v#.# From Scratch Setup
This package has the raw bones of the Hoodie. Normally you would use this package if you have a custom Model edit with your Taidum, or have a lot of work like toggles or props you wish not to lose and don’t want to take the time to add to the new project.
Step 1 - Import the package, then drag in the .prefab file for the hoodie into your Hierarchy.
Step 2 - Right Click and unpack the prefab. After opening up the prefab you will see the Armature. Inside the Armature, you’ll see HoodieHip, HoodieSpine, HoodieThigh_L, etc. You need to drag and drop these bones into the bones on your base model. For example, HoodieHip Goes under the Hip in the Hierarchy, HoodieSpine goes under the Spine, and so on. If you find any bones that have names that don’t match with a body part, don’t touch it. Leave it inside the parent it was already in.
Step 3 - After setting it up in the Hierarchy, The hoodie is basically set up. However now we want the hoodie strings to work. Inside the FX, add the following Parameters “HoodString_R_Stretch”, & “HoodString_L_Stretch”. Next, go into Layer Tab and add a new Layer. Let’s name it “Hoodie” and set the weight to 1. Inside the layer try following along with this Animator Map.
Step 4 - Model Edit. In Blender, you need to add 2 new blendshapes (Shape Key) where the fur lays down for the hoodie. “BodyFurDown”, & “HeadFurDown”. The name speaks for itself, but make sure you separate the head fur lay down and the body fur lay down separate.
IrixTaidum2.0_TaidumHoodieBySpiro_v#.# Setup
This package is already set up for the most part, but I'll be more than welcome to share what you first need to do when setting up the package in unity!
Step 1 - Create a new Unity project on the VRChat required version of Unity. After the project is loaded IMPORT THE LATEST VRCHAT SDK BEFORE ANYTHING! It does not come with the package.
Step 2 - After that, you can import the package. Once the project loads you should see the Taidum model with a hoodie. If it’s not in the scene, Drag the Taidum .prefab into the Hierarchy.
Step 3 - If you decide to scale your model and notice some weird hood stretching. Go to “HoodieHead.001” in the Hierarchy. Inside you will see a Parent Constraint. Open up the Constraint settings tab, and uncheck “Lock”. Zero everything out, then click “Activate” and it should be fixed.
Rules & Terms
I don't really care what you do with the hoodie. However, I do have some terms I'd like you to please follow!
Don't claim you made the hoodie. I put a lot of time and work into making this, and I don't need someone else running around saying they did all the hard work.
Please don't overcharge for Hoodie Retextures. To some point, it is acceptable as it takes a lot of time and work. But it's only a basic hoodie and should not exceed the $50 USD mark just for a retexture.
Don't redistribute hoodie files! I made the assets free, however, it supports me when you download them from this source.
That's it! Enjoy your TAD Taidum Hoodie!
(P.S) If you wish to support me and the creation of this hoodie, I have a DLC planned that will allow you to donate to me and get all kinds of TAD hoodie textures! ^w^
Hewo! 🦊 Welcome to my Commissions page! Here you'll find pricing details for Avatar Retextures and more. 💰
For updated information please view my Trello page: https://trello.com/b/QYSU6NtV
Prices & Offers
Prices will be added together based on what you request. For example, a Retexture Cost + Platform Conversion Cost = Total Cost. Also, keep in mind prices can vary based on the Complexity & time of the Designs or Requests.
- Retexture - $20.00
- Model Edits - $15.00
- Platform Conversions - $10.00
- Interactions - $3.00
- Accessory's - $10.00
- Toggles - $3.00 (If something you want isn’t listed, please contact me. ^w^)
Avatar Bases
I love doing avatar work, but for my own sanity, I’m limiting my work to some popular base models. This is to make it easier on me and to maintain consistency with assets, retextures, licensing, and editing. Also keep in mind that in order for me to fulfill your commissions, it is necessary for you to possess a license copy similar to mine.
Bellow you will find a list of models I’m offering to work with:
Taidum - Irix - https://irix.gumroad.com/l/DpDFe?layout=profile&recommended_by=library FluffyDog - Irix - https://irix.gumroad.com/l/bikcyg?layout=profile&recommended_by=library The Awtter - Shade the Bat - https://shadethebat.gumroad.com/l/awtter Kepler - gigash - https://booth.pm/en/items/3000412 Regulus - gigash - https://booth.pm/en/items/2365403
More to come soon! If your model is not listed and you still want to make a request, please contact me.
Terms of Service:
-
No NSFW Commissions or Requests: Please understand that I do not accept commissions or requests for explicit, adult, or NSFW (Not Safe for Work) content. Thank you for respecting this policy.
-
One Free Fix/Edit: Your satisfaction with the commission is important to me. After you've made the payment, I offer one complimentary fix or edit to ensure it matches your vision. This offer is valid for one week from the delivery date. Please let me know any adjustments you'd like during this time.
-
Timelines and Communication: Clear communication is key throughout the commission process. I'll provide estimated timelines based on project complexity. However, life happens and things may arise that affect delivery. I'll keep you updated and work hard to complete the project within a reasonable timeframe.
-
Ownership and Usage Rights: I retain the copyright and ownership of the commissioned artwork unless otherwise agreed upon. You'll receive a non-exclusive license for personal, non-commercial use. Please do not reproduce, distribute, or sell the artwork without my prior written consent.
-
Refunds and Cancellations: I do not offer refunds once the commission has been completed and delivered. However, I am committed to ensuring your satisfaction with the final result. If you have any concerns or require adjustments, please let me know during the one-week period after delivery, and I will do my best to accommodate your requests.
-
Content self-upload is mandatory: I want to clarify that I will not be responsible for uploading the content on your behalf to the desired platform. It is essential for you to have a method or capability to upload the content yourself.
These simple terms are meant to ensure a pleasant experience for both of us. If you have any questions or suggestions, feel free to let me know.